|
Build a MPLAB PIC
assembler project,
without writing a single line of assembly
source code !
- Do you want to be the best & quickest PIC asm coder of
the world ?
- Do you want to cheat your boss, and make him believe that
you are a PIC assembler genius ?
- Your clients want a MPLAB MPASM source code, but you
prefer to use C, Pascal or Basic language ?
That's easy, you can do it !
Just write your PIC program in C, Pascal or Basic with a
MikroElectronika compiler, then turn the assembly output of the compiler into a
real MPLAB MPASM source code, build the .HEX file and flash it into your PIC :
it will run just like the binary output of the mikroElektronika
compiler.
You will have also your C, Pascal or Basic
lines with comments in the ASM source code !
=> Please note that this translator converts PIC12
& PIC16 source code, PIC18 will be added later.
If you are already familiar with this page, then jump directly to the translator.
Otherwise, please
read carefully the following instructions.
You may also post questions,
comments or bugs in my forums.
STEP 1 : Choose your high-level language
If it is not already done, download and install one of these MikroElektronika
compilers for PIC12, PIC16 and PIC18 devices :
C language : mikroC
http://www.mikroe.com/en/compilers/mikroc/pic/
Pascal : mikroPASCAL
http://www.mikroe.com/en/compilers/mikropascal/pic/
Basic : mikroBASIC
http://www.mikroe.com/en/compilers/mikropascal/pic/
These compilers are free to download (no registration form needed).
In
Demo version (without registration key) they are fully fonctional (all libraries
& tools are included), the only limitation is a 2k program words maximum
size output. In other words, these compilers are free for most of the devices of
the PIC12 and PIC16 family.
STEP 2 : Write your program
Write your program with the mikroElektronika compiler and
test it as usual, and don't bother now about assembler.
You can start with one of the numerous source code examples that come with
the compiler.
STEP 3 : Create a MPLAB MPASM project
Assuming Microchip MPLAB IDE is installed on your computer (or download it
from : http://www.microchip.com/stellent/idcplg?IdcService=SS_GET_PAGE&nodeId=1406&dDocName=en019469&part=SW007002 ),
create a new MPASM project with the project wizard.
Create a new file, leave it empty now, save it and add it to your
project.
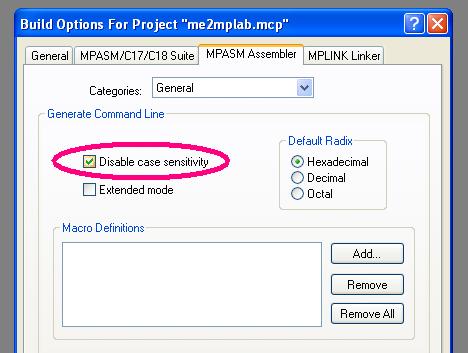
Then edit the build options for the project, go to : Project -> Build
Options -> Project -> MPASM Assembler and check the "Disable case
sensitivity" case :

You have to do this because mikroElektronika linker is case-insensitive,
and labels are sometimes written with different cases in the assembly
output.
STEP 4 : Convert MikroElektronika assembly output
into MPLAB MPASM source code
Once your C, Pascal or Basic program is compiled and runs fine, it's time to
convert it into a MPLAB MPASM source code.
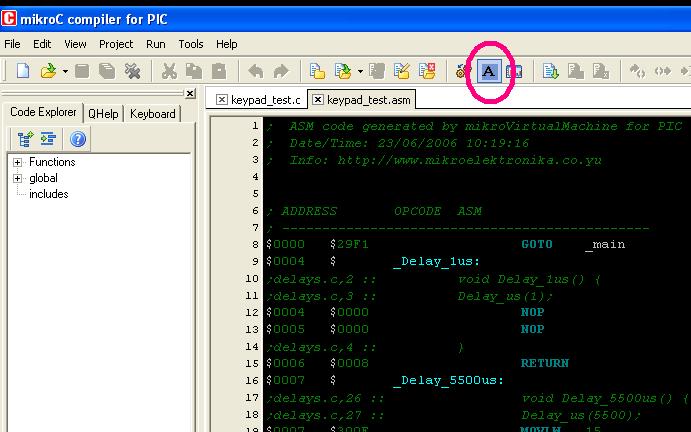
Open the assembly view of your compiled program by clicking on the "A"
button :

A new editor shows up with the MikroElektronika mikroVirtualMachine source
code of your program.
As you can see, it is not MPLAB MPASM compliant, but not far
away... You could try to translate it by hand, this is surely possible but it
will take hours.
You would better have to try this :
Select the mikroVirtualMachine source code, copy it and paste it
into this form :
Then copy the translated MPLAB MPASM source
code above into your MPLAB source code editor window, and build the project :
that's all you have to do  ! !
Important warnings :
- the translator does not do any checks, because it trusts the
mikroVirtualMachine source code.
- you are aware that this service is given as a translator example, without
guarantee of any kind.
- you are using this service under your own responsibility.
- a program that does not run will not run better after translation.
Please post questions, comments or bugs in my forums.
Happy translations !
|