|
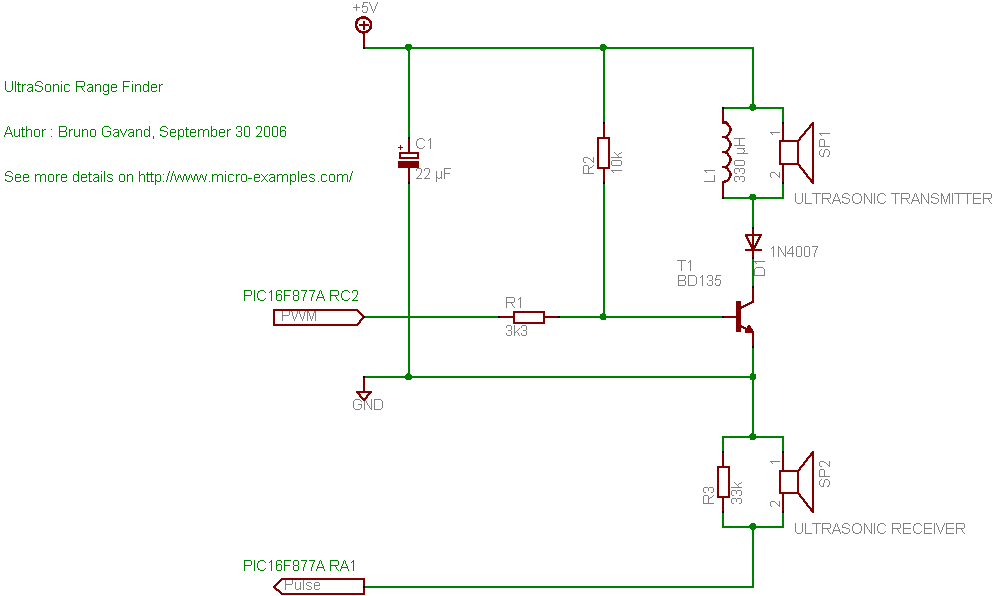
/*
* file : sonar.c
* project : Simple UltraSonic Range Finder
* author : Bruno Gavand
* compiler : mikroC V6.2
* date : september 30, 2006
*
* description :
* This is a basic ultrasonic range finder, from 30 to 200 centimeters
*
* target device :
* PIC16F877A with 8 Mhz crystal
* or any PIC with at least one ADC and PWM channel
*
* configuration bits :
* HS clock
* no watchdog
* no power up timer
* no brown out
* LVP disabled
* data EE protect disabled
* ICD disabled
*
* see more details and schematic on http://www.micro-examples.com/
*/
/********************
* MACRO DEFINITIONS
********************/
/*
* ultra sonic pulse length in microseconds
*/
#define PULSELEN 300
/*
* circular buffer size for samples averaging
*/
#define BUFSIZE 10
/*
* LCD PORT
* EasyPic2, EasyPic3 : PORTB
* EaspyPic4 : PORTD
*/
#define LCDPORT PORTD
#define LCDTRIS TRISD
/*******************
* GLOBAL VARIABLES
*******************/
unsigned char outOfRange ; // out of range flag : set when no echo is detected
unsigned int buf[BUFSIZE] ; // samples buffer
unsigned char idx = 0 ; // index of current sample in buffer
/*****************************************
* INTERRUPT SERVICE ROUTINE
* This ISR handles TIMER1 overflow only
*****************************************/
void interrupt(void)
{
if(PIR1.TMR1IF) // timer1 overflow ?
{
outOfRange = 1 ; // set out of range flag
PIR1.TMR1IF = 0 ; // clear interrupt flag
}
}
/************
* MAIN LOOP
************/
void main()
{
ADCON1 = 0 ; // enables ADC
TRISA = 0xff ; // PORTA as inputs
PORTA = 0 ;
TRISC = 0 ; // PORTC as outputs
PORTC = 0 ;
// TIMER1 settings
T1CON = 0b00001100 ; // prescaler 1:1, osc. enabled, not sync, internal clk, stopped
#ifdef LCDPORT
// init LCD
Lcd_Init(&LCDPORT) ; // use EP2/3/4 settings
Lcd_Cmd(Lcd_CLEAR) ; // clear display
Lcd_Cmd(Lcd_CURSOR_OFF) ; // cursor off
Lcd_Out(1, 1, "UltraSonicRanger") ;
Lcd_Out(2, 5, "cm") ;
#endif
// init PWM Channel : 40 Khz, 50% duty cycle
PWM1_Init(40000) ;
PWM1_Change_Duty(128) ;
INTCON.GIE = 1 ; // enable global interrupts
INTCON.PEIE = 1 ; // enable peripheral interrupts
PIE1.TMR1IE = 0 ; // disable timer 1 interrupt
PIR1.TMR1IF = 0 ; // clear timer 1 interrupt flag
// forever
for(;;)
{
unsigned char i ; // general purpose byte
unsigned long cm ; // distance in centimeters
unsigned char str[4] ; // string for range display
// prepare timer
T1CON.TMR1ON = 0 ; // stop timer
outOfRange = 0 ; // reset out of range flag
TMR1H = 0 ; // clear timer1
TMR1L = 0 ;
T1CON.TMR1ON = 1 ; // start timer 1
PIE1.TMR1IE = 1 ; // enable timer 1 interrupts on overflow
// send pulse
PWM1_Start() ; // enable PWM output : transducer is pulsed at ultrasonic frequency
Delay_us(PULSELEN) ; // during PULSELEN microseconds
PWM1_Stop() ; // stop PWM
Delay_us(PULSELEN * 2) ; // do nothing for twice the pulse length duration to prevent false start
while(Adc_Read(1) < 1) // while no pulse detected (no signal on ADC channel 1)
{
if(outOfRange) break ; // to late, out of range
}
T1CON.TMR1ON = 0 ; // stop timer 1
PIE1.TMR1IE = 0 ; // disable timer 1 interrupts on overflow
#ifdef LCDPORT
if(outOfRange) // is overrange condtion detected ?
{
Lcd_Out(2, 8, "OverRange") ; // display overrange message
}
else if(TMR1H < ((PULSELEN * 6 * Clock_kHz()) / (1000 * 4 * 256))) // is underrange condition detected ?
{
Lcd_Out(2, 8, "UnderRnge") ; // display underrange message
}
else // good reading
{
buf[idx] = TMR1H ; // build a 16 bit value from timer1
buf[idx] <<= 8 ; // MSB
buf[idx] += TMR1L ; // LSB
// circular buffer
idx++ ; // next location
if(idx == BUFSIZE) // the end is reached ?
{
idx = 0 ; // back to start
}
cm = 0 ; // prepare centimeter averaging
for(i = 0 ; i < BUFSIZE ; i++) // for all samples in buffer
{
cm += buf[i] ; // add to sum
}
cm /= BUFSIZE ; // average samples
/*
* cm contains now the number of clock cycles
* from the start of the ultrasonic transmission
* to the first echo detection
* the duration in second is s = cm / (Clock_Khz() * 1000 / 4)
* if we admit that sound speed in the air is 340 m/s
* the distance in centimeters (forth and back) is d = s * 340 * 100 / 2
* or d = 340 * 100 / 2 * cm / Clock_khz() / 1000 * 4
* d = 34 * 2 / Clock_Khz()
*/
cm *= 34 * 2 ; // now converts to centimeters
cm /= Clock_Khz() ;
ByteToStr(cm, str) ; // convert to string
Lcd_Out(2, 1, str) ; // print string
Lcd_Out(2, 8, " ") ; // clear error message
}
#endif
Delay_ms(10) ; // 10 milliseconds delay before next sample
}
}
| 